
The cedar tops on my instruments from (website) are beautiful, but
the downside of them is, they’re very soft. I had good success repairing
a file mark in the top of the soundboard, and though I matched up the
grain rather well, it was still very obvious as the only feature on the
face of the instrument. So, while I hadn’t originally planned on heavy
ornamentation, the decision was made for me. Nobody is going to look at
the screwup if there’s pretty pictures next to it!
While I was considering my options, it occurred to me that I
probably should have planned for ornamentation the whole time in the
name of authenticity. The “oh look at the pretty wood” mindset is to
some extent modern. Many wooden items found in graves are made of woods
that would have been imported, like beech, so of course people of the time also
appreciated a nice *exotic* wood. But that doesn’t mean that they
forewent ornamentation in the name of showing the wood off. For them,
wood was what you made everything out of, and keeping it plain meant you
didn’t have the time or expertise to do anything else to it; so simply
being wooden wasn’t very interesting. Nowadays, where our lumber is
frequently terrible, carpentry is a niche skill, and cheap items are
made of plastic, clean work and a good polish is enough to be
impressive.
So we see the decoration-heavy mindset in the Trossingen lyre, which has a scene of
a shield wall kolrosed into the face, along with an ornamental pattern.
Kolrosing is much like scrimshaw conceptually - one scratches the
design into the wood and then applies pigment into the scratches.
 |
| Recproduction by Michael J King |
I decided that a nearly finished lyre would be the wrong time to
learn yet a new process, so I stuck to what I knew and broke out the
woodburner. The original design wouldn’t fit my instrument, nor would it
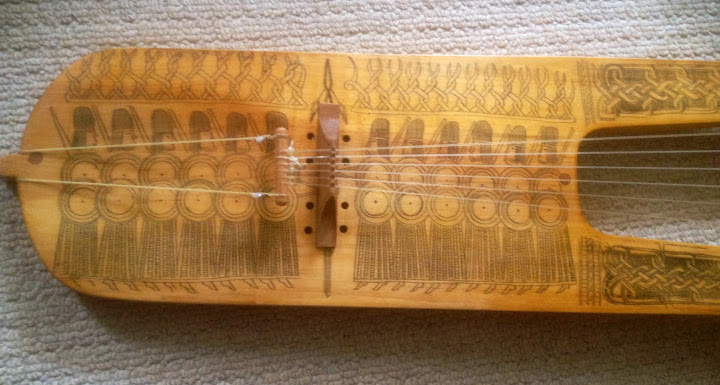
make sense held vertically, so I forged my own path. On the top, where I
had the most canvas, I put my Ringerike-style hippogriff design. This
was a bit of a challenge, as this was the smallest I’ve drawn it by
hand. On either side of the tailpiece, I grabbed a piece of border art
from Jonas Lau Markussen, who has a lot of great resources on Viking and
Anglo-Saxon art.

Once the wood burning was done, I cleaned it up with 800 grit
sandpaper, then moved up to 2000 grit and applied Danish oil before a
final polish and oil with 3000 grit. I was pleased to get at least a
little chatoyancy from the maple and some fun grain structure.

I wanted to do something special for the tailpiece, so I got a very
nice size antler shovel from Scene of the Crash reindeer farm. I cut
the shape out on the scroll saw, thinned it out, and drilled holes for
the tailgut and fine tuners. While the fine tuners aren’t exactly
period, they save so much sanity versus pure friction pegs. Three
circle-dot motifs, added with my modified screwdriver, complete the
look. This was actually the first piece I finished, even before I bought
the wood.

Modern lyre players recommend nylon for the tailgut, since it isn’t
sensitive to humidity. Many luthiers opt for paracord. If you have an unobtrusive color, this can look fine, but I
decided to be different and did a ten-strand fingerloop braid of
artificial sinew. Since this is waxed nylon, it would stay put just as
well as the paracord with a hopefully less modern look.

The first iteration bridge was cut from 3/16” maple and tapered
down in a simplified version of a violin bridge. Period bridges, such
that we’ve recovered, are frequently quite thick and are sometimes made
of amber. However, a massive bridge also noticeably dulls the sound, so I
didn’t want to go that route if I could avoid it.

My strings, as per tradition, are made of twisted horsehair. I
really wanted black horsehair, which is coarser and more textured, but
that was out of stock, so I stuck with bleached. My mentor has a video
demonstrating the process (in nylon) much better than I can type it out here:
The bow was another sentimental piece. Constructing a simple, untensioned bow is all about finding the right stick.
In this case, a willow branch is ideal - light, strong, stiff, and the
right diameter directly off the tree. I went to the Fuller Lakes
trailhead, which was where I did a three-generation camping trip as a
young teenager. A ways off the trailhead, to the side of the road where
nobody goes, was the Perfect Stick- half an inch wide at the base with a gradual taper, with smooth bark, only a few tiny leaf buds,
and growing more or less straight up.
In lieu of steam bending, I just boiled the end until it took a
curve by tightening some paracord around a roll of duct tape. Taking the
bark off was initially an accident. I tried to clean my cut edge and accidentally removed a strip, so I just kept going and found I liked the texture. To mount the hair, I cut a slit in either
end of the stick, knotted the hair on either side, and wrapped some bark around the
ends with some liquid hide glue over top to secure everything. Gentle application of a flame helped to tighten stray hairs that didn't want to maintain tension.


 |
| Mine below, original above |
The biggest adventure at this stage was after assembly, trying to
figure out string diameters, bridge weights and proportions, and all the
other variables turning a weird box into an instrument. I eventually
settled on a thin, wide bridge that somewhat evokes the original, and
replaced the tailgut with a six strand braid. I’m mostly happy with the
sound, though for a long time the D string (in my attempted D4-A3-E4 tuning) has had some kind of resonance that makes
it louder than the others. At a mere 17 hairs, no lower tension can be reasonably had; the problem seems to be a wolf note, where the natural resonance of the instrument body suddenly shines through. Placing a third finger on the A string and hitting the d4 in unison made the instrument practically shout. All that said, as a first instrument to be completed, it was a rather good success. Imperfect, certainly, but considering how little I really knew for sure about what I was doing, it could have been far worse.
In pursuit of fixing that wolf tone, I've restrung it since, and dropped my tuning by a step overall, to produce CGD, from viewer right to left. This gives it a more rustic sound and moves the D note away from the bass bar, which seems to avoid most of its problems. It's still not a loud instrument by any means - the sound box is still relatively small, and perhaps thicker than necessary, so it can only be so loud. But of the two instruments, this one is shallow enough that I can clamp a bridge pickup onto it. If I need to be heard across a room, I can put a pocket amp discreetly under my chair.


